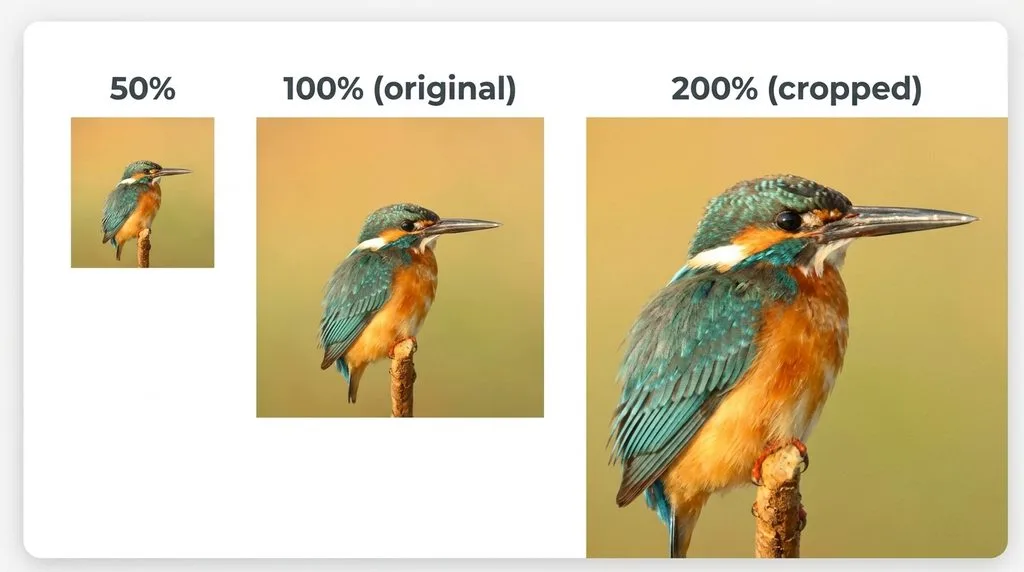

Yes, you can resize an image without losing quality — but it depends entirely on which direction you’re going. Shrinking an image (downscaling) is basically free: you’re throwing away pixels, and a good algorithm keeps everything sharp. Enlarging an image (upscaling) is where quality dies, because your software has to invent pixels that were never there. No tool can add detail that the camera never captured. For downscaling, use Bicubic Sharper or Lanczos. For upscaling, use Preserve Details 2.0 in Photoshop or an AI upscaler like Topaz Gigapixel or the free Upscayl. And for anything going on the web, forget about DPI — only pixel dimensions matter.
If you remember nothing else: resize from the original file, do it once, lock the aspect ratio, and sharpen lightly afterward. Everything else in this guide is just the details.
What Actually Happens When You Resize an Image
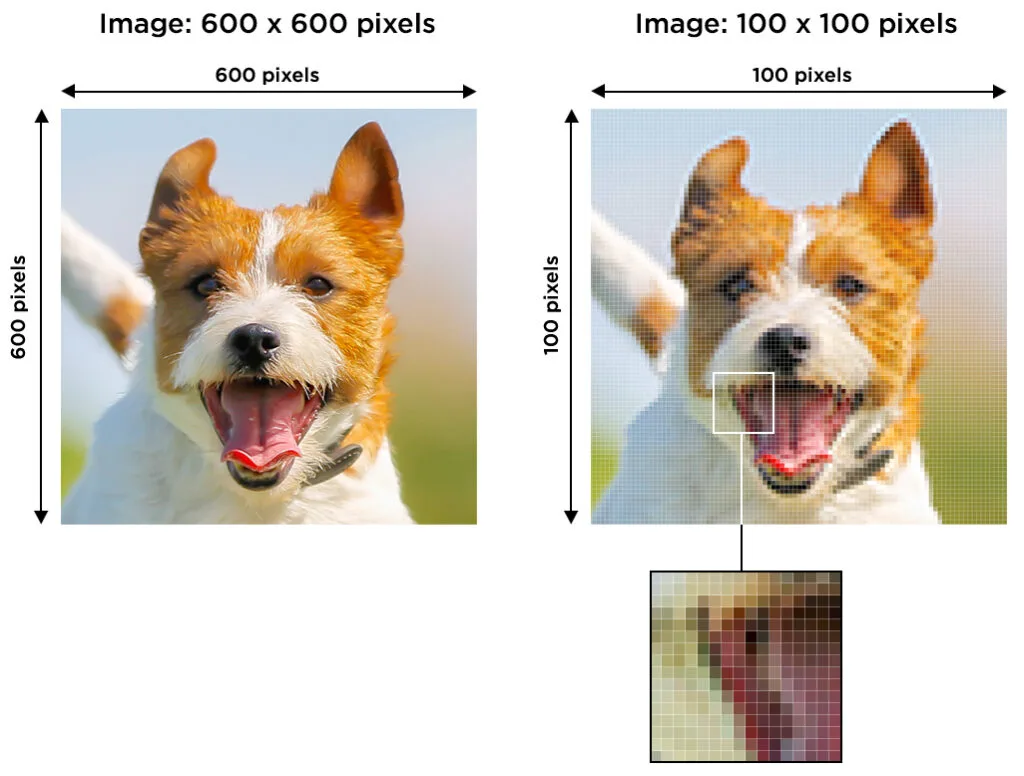
A digital photo is just a grid of colored squares — pixels. When you resize it, your software has to figure out what color each new pixel should be. That process is called resampling, and the method your software uses makes all the difference.
When you downscale (make it smaller), the software averages groups of existing pixels into fewer, bigger ones. You’re discarding information, but done right, the result looks clean and sharp. When you upscale (make it bigger), the software has to guess what color the new, in-between pixels should be. It can interpolate — blend from neighboring pixels — but it can’t invent real detail. That’s why a 200% enlargement always looks softer or blockier than the original. AI upscalers change the game a little by hallucinating plausible detail, but it’s still a guess, not the real thing.
Resampling Methods: Which One to Pick (And When)
Every editor gives you a dropdown of resampling options. Most people leave it on Automatic and never think about it. But picking the right one is the single biggest factor in how sharp your resized image looks.
| Method | Best For | Why |
|---|---|---|
| Nearest Neighbor (hard edges) | Pixel art, screenshots, hard-edge logos | No blending — keeps crisp blocks. Looks terrible on photos. |
| Bilinear | Fast previews, simple graphics | Blends 4 pixels. Quick but soft on detail. |
| Bicubic (smooth gradients) | General photos, default | Blends 16 pixels. Good all-rounder. |
| Bicubic Smoother | Enlarging photos | Adds slight blur to hide interpolation artifacts. |
| Bicubic Sharper | Shrinking photos for web | Adds slight sharpening to compensate for lost detail. |
| Preserve Details 2.0 | Enlarging photos | Photoshop’s AI-ish upscaler. Reduces noise, keeps texture. |
| Lanczos | Maximum sharpness (GIMP, Affinity, online tools) | Sharpest results but can create light halos around edges. |
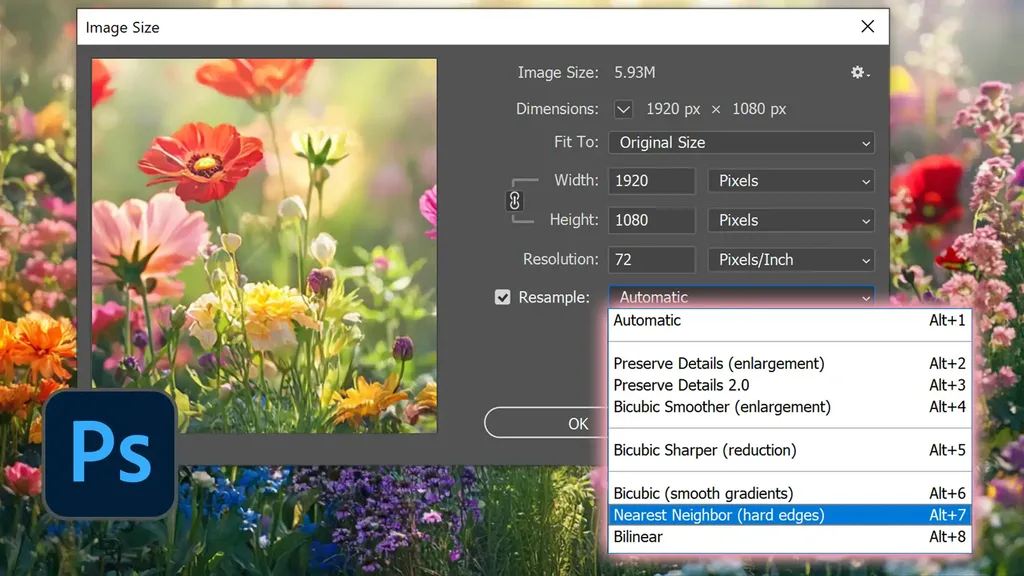
The rule of thumb is simple: shrinking? Bicubic Sharper or Lanczos. Enlarging? Preserve Details 2.0 or an AI upscaler. Pixel art or screenshots? Nearest Neighbor. A detailed resampling methods comparison will show you the same pattern on test images: the right filter is always chosen by direction and content, never by default.
How to Shrink an Image and Keep It Sharp
Downscaling is the easy direction, but there are still wrong ways to do it. Here’s the process that keeps images crisp.
- Start from the original file. Never resize a JPEG that’s already been resized and re-saved. Every JPEG save adds compression artifacts. Work from the RAW, TIFF, or highest-quality original.
- Lock the aspect ratio. Make sure the chain-link icon between width and height is on. If you stretch one dimension independently, your subject will look squashed.
- Pick Bicubic Sharper (or Lanczos). For reductions, this is the sweet spot — it compensates for the softening that comes from averaging pixels.
- Resize in one step. Going from 4000px to 2000px in one pass is better than 4000 → 3000 → 2000. Every resample pass degrades the image a little.
- Sharpen lightly afterward. A touch of Unsharp Mask or Smart Sharpen (amount 50–80%, radius 0.5–1px) restores the snap that resizing softens. Don’t overdo it — halos around edges are the telltale sign of too much sharpening.
- Save in the right format. For photos, JPEG at quality 80–90. For graphics with text or transparency, PNG or WebP. If you need to check the output, a quick file size checker tells you instantly whether you’ve hit your target.
For quick jobs where you don’t want to open Photoshop, a free online image resizer handles all of this in the browser — you upload, type the dimensions, and download. For pure reductions, an image downscaler is even faster because it’s optimized for the shrinking direction.
How to Enlarge an Image (And When Not To)
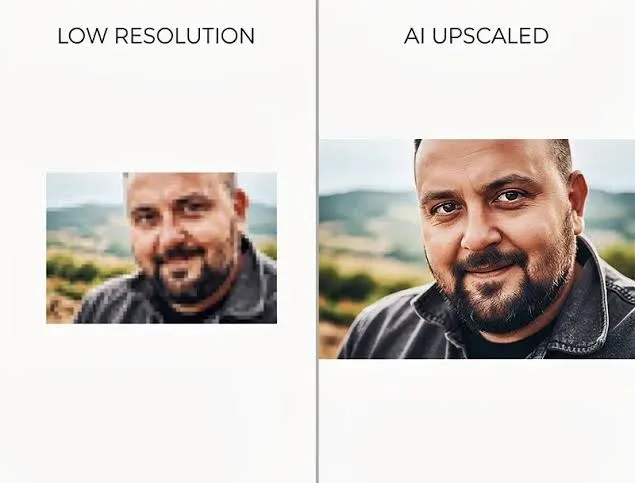
Here’s the hard truth: you cannot add real detail by enlarging. What you can do is make the enlargement look plausible — smooth, not blocky — and in 2026, AI does that better than any traditional interpolation method.
Traditional upscaling (Bicubic Smoother, Preserve Details 2.0) blends pixels to hide the seams. It’s fine for small enlargements — 10–30% bigger — where the eye won’t notice. Beyond that, you’ll see softness.
AI upscalers (Topaz Gigapixel AI, Magnific, Upscayl) take a different approach. They’ve trained on millions of images and can guess what texture should be there — skin pores, fabric weave, hair strands. The 2026 field splits into three camps, per blind tests: Topaz Gigapixel 8 wins for photographic fidelity (it doesn’t invent detail that wasn’t there), Magnific AI wins for creative reinvention (it adds plausible detail aggressively), and Upscayl 4.0 wins for free, open-source, runs-on-your-own-machine upscaling with over 44,000 GitHub stars. An AI upscaler comparison from blind testing shows the same split: pick by your goal, not by the marketing page.
Rules for enlarging:
- Start with the cleanest, highest-resolution source you have. Noise and blur get amplified.
- Go in steps if you need a big jump — 2x, then another 2x — rather than 8x in one pass.
- Check faces and text at 100% zoom. That’s where AI artifacts show up first.
- Never overwrite the original. Always save a copy.
- If the image is tiny (under 500px on the long edge), don’t expect miracles. AI can help, but garbage in, garbage out still applies.
The DPI Myth: Why “72 DPI for Web” Is Wrong
This is the single most common misunderstanding in image resizing, and it costs people hours of unnecessary work. Here’s the truth: DPI (dots per inch) does not matter for anything displayed on a screen. Browsers completely ignore the DPI tag stored in an image file. A 1200×800 pixel image saved at 72 DPI and the same image saved at 300 DPI display pixel-for-pixel identical in every browser. They even have the same file size. The only thing a screen cares about is pixel dimensions.
The “72 DPI for web” rule is a leftover from the 1980s when early Mac screens actually displayed 72 pixels per inch. Modern phones are 300–500 PPI. The number in the file header is just metadata — it doesn’t change a single pixel.
DPI only matters when you print. And there, it’s simple arithmetic: required pixels = print size in inches × target DPI. 300 DPI is the standard for photo and commercial print; 150 DPI is fine for large-format posters viewed from across the room. A thorough DPI vs PPI explainer covers the difference, and the best DPI for printing breaks it down by project type. The short version: resize by pixel dimensions, never by DPI.
| Print size (inches) | Pixels needed at 300 DPI | Pixels needed at 150 DPI |
|---|---|---|
| 4 × 6 | 1200 × 1800 | 600 × 900 |
| 5 × 7 | 1500 × 2100 | 750 × 1050 |
| 8 × 10 | 2400 × 3000 | 1200 × 1500 |
| 8.5 × 11 (Letter) | 2550 × 3300 | 1275 × 1650 |
| 11 × 14 | 3300 × 4200 | 1650 × 2100 |
| 16 × 20 | 4800 × 6000 | 2400 × 3000 |
| 24 × 36 (poster) | 7200 × 10800 | 3600 × 5400 |
A 12-megapixel phone photo (4000×3000) covers an 8×10 at 300 DPI easily. The 72 DPI tag in the file? Irrelevant.
File Formats: Which Ones Survive Resizing
The format you save in matters as much as the algorithm. Repeatedly opening and re-saving a JPEG is like making a photocopy of a photocopy — each generation gets a little worse.
- JPEG — Lossy. Great for photos, small file sizes. Never use as a working format. Save once, at the end.
- PNG — Lossless. Perfect for screenshots, text, graphics, transparency. File sizes are bigger.
- WebP — Modern, supports both lossy and lossless, plus transparency. Smaller than both JPEG and PNG. Best default for the web in 2026.
- TIFF — Lossless, huge files. The professional working format — use it if you’ll be editing and resizing repeatedly.
- SVG / vector — Not pixels at all. Scales infinitely with zero quality loss.
If you’re working with PNGs and need to trim file size after resizing, a compress PNG tool shrinks the file without touching pixel quality. And if you’re exporting for different quality levels, an image quality changer lets you dial in the exact compression before you download.
Vector vs Raster: Why Logos Never Pixelate
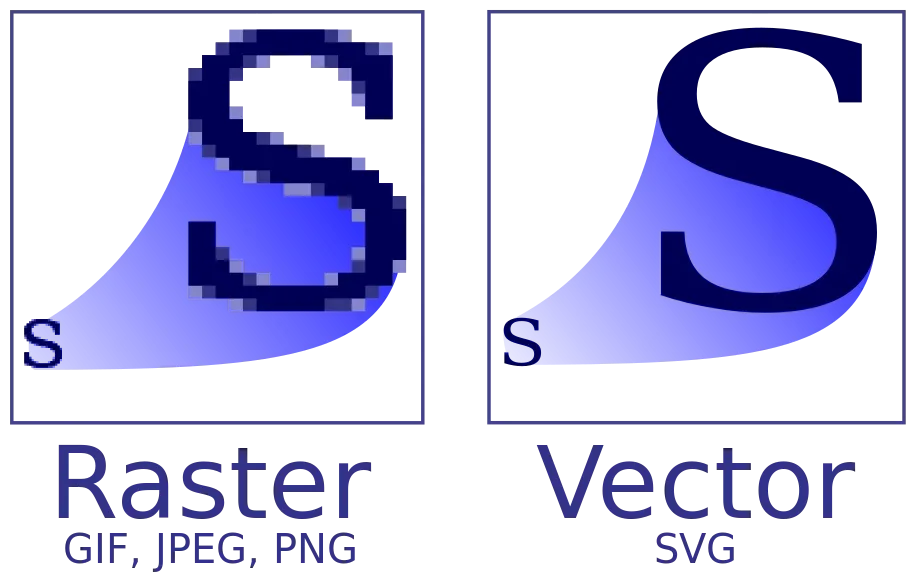
If you’ve ever wondered why a logo stays crisp at any size while a photo gets blurry, here’s the answer. Photos are raster — grids of fixed pixels. Logos and icons are often vector — math equations describing shapes and curves. A vector file can be scaled to billboard size or thumbnail size and it’s always perfectly sharp, because the computer just redraws the shapes at the new size.
Practical takeaway: if you’re resizing a logo, icon, or illustration, find the vector source (SVG, EPS, AI, PDF) and export from there. Trying to enlarge a rasterized logo is a losing battle. If you only have a small raster version, an AI upscaler can help, but a vector original will always win.
Step-by-Step: Resizing in Photoshop (Exact Settings)
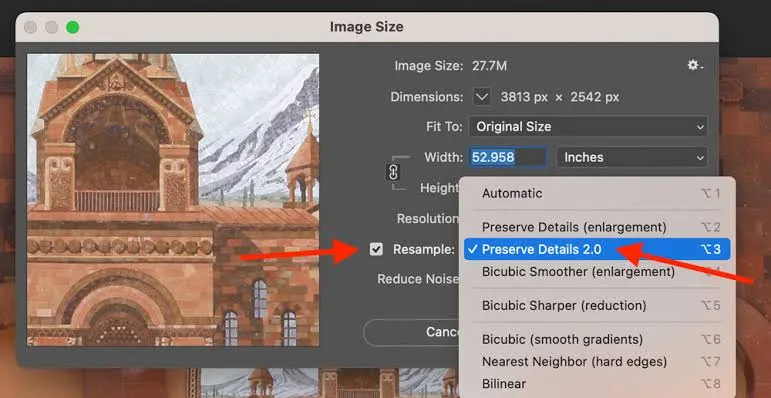
Adobe’s official Photoshop resize guide walks through the dialog, but here are the settings that actually produce sharp results.
- Open your image. Go to Image → Image Size (Alt+Ctrl+I / Option+Cmd+I).
- Lock the aspect ratio by clicking the chain icon between Width and Height.
- Set the unit dropdown to Pixels (for web) or Inches + Resolution (for print).
- For web: type the pixel width you need. Height auto-fills.
- For print: uncheck Resample, type your print size in inches, and check that Resolution reads 300. If it drops below 240, you don’t have enough pixels — go back to a bigger source.
- Pick your Resample method: Bicubic Sharper for shrinking, Preserve Details 2.0 for enlarging, Nearest Neighbor for pixel art.
- Click OK. Then apply a light Smart Sharpen (Filter → Sharpen → Smart Sharpen, Amount 50–80%, Radius 0.6px).
- Save As — never Save over the original.
The SitePoint guide on keeping images sharp demonstrates the same technique with side-by-side comparisons of Bilinear vs Bicubic Sharper — the difference on text and fine lines is night and day. If you’re resizing a whole folder at once, use File → Scripts → Image Processor to batch the whole thing.
The Golden Rules of Resizing (Memorize These)
- Always work from the original. The highest-resolution source you have. Never resize a resize.
- Resize once. Plan your final dimensions before you touch the slider. Multiple passes compound quality loss.
- Lock the aspect ratio. A stretched photo screams “amateur” louder than any other mistake.
- Pick the right resampling method. Direction (up or down) and content (photo vs pixel art) decide it.
- Sharpen after, not before. Sharpening then resizing amplifies artifacts.
- Save as a copy. Keep the original untouched. You can’t get discarded pixels back.
- For web, think in pixels, not DPI. DPI is a print-only concept.
- For big enlargements, use AI. Traditional interpolation can’t compete at 2x+.
Five Mistakes That Ruin Resized Images
- Resizing a JPEG that’s been saved multiple times. Each save adds compression noise. Start from the original.
- Ignoring the resampling dropdown. Automatic picks the wrong method surprisingly often. Set it manually.
- Enlarging more than 2x without AI. Beyond that, traditional interpolation turns to mush.
- Changing DPI for web images. It does nothing useful and confuses your team. Resize by pixels.
- Forgetting to sharpen afterward. Even a perfect downscale looks slightly soft. A light sharpen restores punch.
Frequently Asked Questions
Can you really resize an image without losing quality?
Downscaling — yes, essentially. You discard pixels but the result can look perfectly sharp. Upscaling — no, not truly. You can make it look good, but you can’t recover detail that was never captured. AI upscalers invent plausible detail, which is helpful but not the same as real detail.
What is the best resampling method for photos?
For shrinking photos for web or social: Bicubic Sharper. For enlarging: Preserve Details 2.0 in Photoshop, or an AI upscaler. For general work where you’re not sure: plain Bicubic. For pixel art and screenshots: Nearest Neighbor.
Does DPI matter when resizing for a website?
No. Browsers ignore the DPI tag entirely. Only pixel dimensions matter. A 1920×1080 image at 72 DPI and the same image at 300 DPI display identically and have the same file size. DPI only matters for print.
How many pixels do I need for a 4×6 print?
At 300 DPI (the print standard), you need 1200×1800 pixels. Most modern phones produce 12MP+ images (4000×3000), which is more than enough for 4×6 and even 8×10 prints.
Should I resize in Photoshop or use an online tool?
For one-off web images, a good online tool is perfectly fine and faster. For print, batch work, or images where you need full control over sharpening and color, Photoshop or GIMP is better. The resampling math is the same either way.
How do I resize multiple images at once?
In Photoshop, use File → Scripts → Image Processor. In Lightroom, select all and export with a resize setting. Online, most bulk resizers let you drag a whole folder. Always keep the originals.
Why does my image look blurry after resizing?
Usually one of three things: you used the wrong resampling method (Bilinear or Bicubic Smoother on a reduction), you enlarged too much, or you skipped the post-resize sharpening. A light Smart Sharpen pass fixes most cases.
What’s the difference between resizing and resampling?
Resizing changes the print dimensions without touching pixels (you turn Resample off). Resampling actually adds or removes pixels, which changes the file and can affect quality. For web, you always resample. For print sizing, you often just resize.
Final Thought
Resizing is one of those skills that looks trivial until you get it wrong — and once you’ve seen a pixelated logo on a billboard or a blurry hero image on a website, you never unsee it. The good news is that the rules are simple: shrink with Bicubic Sharper, enlarge with AI, think in pixels for screens and DPI only for print, always work from the original, and do it once. Get those five things right and your resized images will look sharp every single time.